

Spare parts inspection
1. Lamp housing
After the lamp housing accessories arrive, open the package to check the appearance, check whether the quantity of the relevant accessories is correct, whether the quality meets the requirements, whether the spare parts are defective, whether it needs to be processed and modified according to the condition of the LED module and the installation requirements of the lamp, and whether the glass has If there is no damage, observe whether the waterproof treatment of the lamp housing is in place and whether secondary waterproof treatment is required.
2. LED light source template
After the light source finished, first carry out a visual inspection to check whether each solder joint has the phenomenon of desoldering, missing soldering, and virtual soldering, whether the welding slag on the board surface is cleaned, and check whether the contact surface between the lamp bead and the aluminum substrate is close to each other, and whether there is any If it is suspended, the lamp beads should be removed and re-soldered to ensure maximum heat conduction.
Next, perform photoelectric test. According to the voltage and current data provided by the supplier, it is suitable for constant voltage cross-current power supply to light up.
Carry out a test to check whether the lamp beads have dead lights , and then cover the light with white paper to check whether the color of the light spot cast on the white paper is consistent, if there is no obvious difference, it can pass. (Note: When testing, be sure to pay attention to the voltage and current parameters of the module, and turn on the power after adjusting the power parameters. Otherwise, the high voltage and current will directly damage the life of the lamp beads, which may seriously damage the module.
3. Constant current source
constant current source first checks the appearance , and checks whether the protection is qualified according to the protection level required by the lamp. Then, according to the number of LED modules in series and parallel, and the system parameters provided, to determine whether the power parameters are correct, and whether they can meet the applicable requirements of lamps and lanterns. First turn on the power supply that matches the input voltage, and check whether its parameters are in compliance.
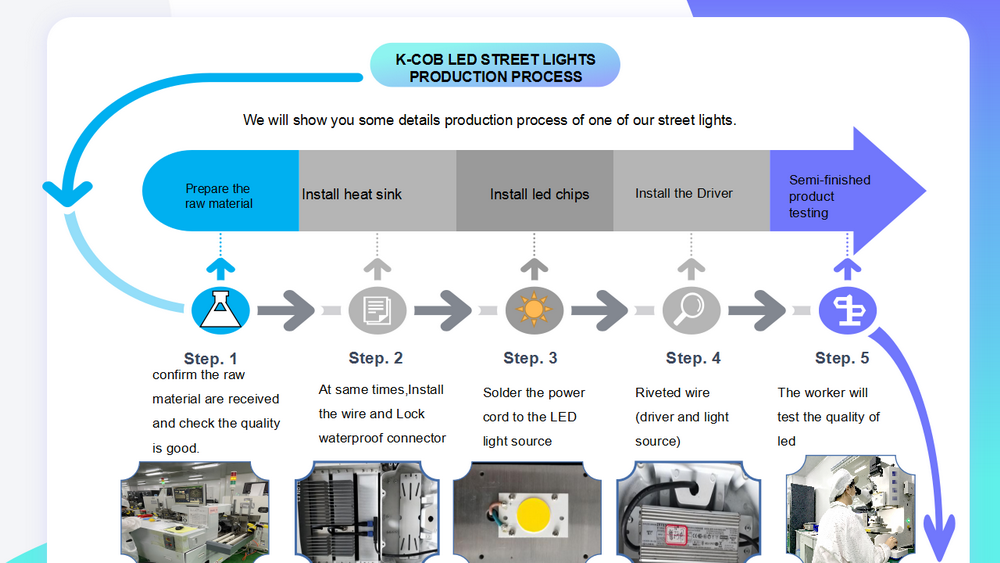
The production of led street lights
1. Fixed module
Before assembling the lamp, first do the anti-static work, wear the electrostatic ring, after the module test, disassemble the lamp housing, observe the position of the fixed base plate, whether it is flat, whether the screw holes match the base plate, and whether it needs to be re-opened.
After setting the position of the aluminum substrate , apply thermal grease to the back of the aluminum substrate. When applying thermal grease, pay attention to ensure that the solder joints of the lamp bead are evenly spread and not too thick. If the situation allows, the entire aluminum substrate can be evenly coated to ensure heat dissipation. , After painting, put the aluminum base plate in the correct fixed position, press hard to make the base plate and the lamp housing completely fit, and then fix the screws. Weld with high temperature resistant wire, and cover the reflector after welding to check whether the appearance is compact and loose.
After fixing, check whether the circuit connection is in good condition, and then turn on the power according to the parameters to check whether the light is normal.
2. Housing installation
After the module is installed , check whether the constant current source needs to be installed inside the lamp according to the requirements. If necessary, the contact surface between the constant current source shell and the lamp shell also needs to be coated with thermal conductive silica gel. Then start to install the housing glass, be sure to observe the lamps before installing the glass
Whether there is a sealant strip, if so, install the sealant strip first, and the glue strip should be correctly stuck in the bayonet of the lamp, if it is difficult to get stuck in , you can stretch it to make it longer and press it to the correct position and then release it restore it.
After the glass is installed, check whether the sealing strip is in place and whether the glass is damaged. After confirming that it is correct, start installing the plugs at both ends. It is also necessary to check whether the sealing strip is installed in place and whether the wires are pulled out through the waterproof hole. After checking, remove the screws. Tighten and install the waterproof connector.
3. Inspection of the whole led fixture
After the lamp is installed, a series of inspections are required to ensure its good quality.
Inspection matters
1. Before the constant current source is not connected, the lamp is powered on and inspected
According to the system parameters, use a DC voltage stabilized power supply to light, pay attention to adjust the voltage and current of the lamps, and the voltage and current are too large, which will directly cause damage to the lamps. After lighting, observe whether the lamp bead has a dead light phenomenon, whether it is not bright or whether there is a short circuit and other bad phenomena. Power-on inspection must be done for each product.
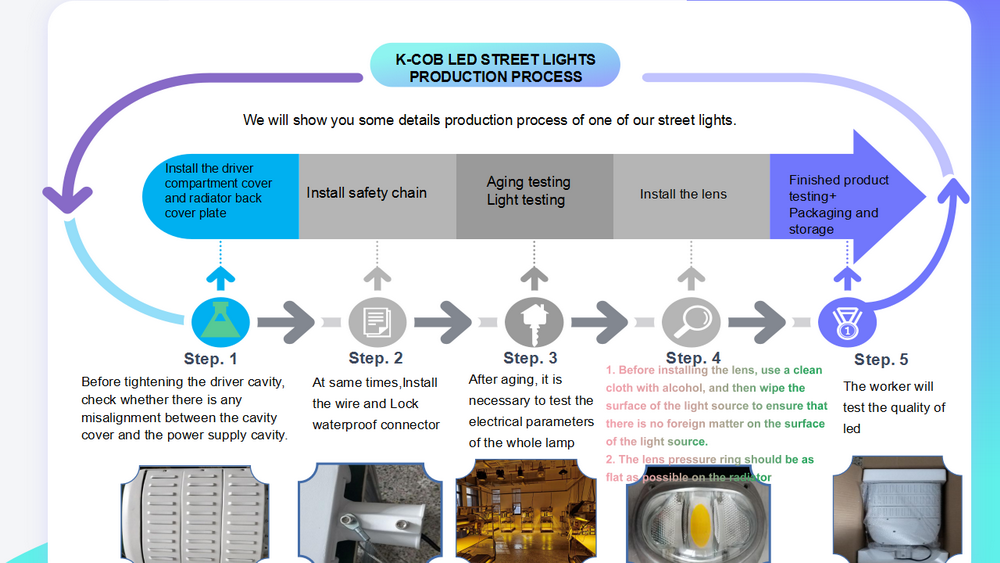
2. Aging test after connecting the constant current source.
The aging of lamps mainly depends on the temperature, voltage, current and luminous flux of lamps after lighting for a long time. Whether there are bad phenomena such as dead lights .
Place the installed lamps on the aging car
Connect the power cord on the lamp to the terminal on the aging car
After all the lamps are connected, press start on the control panel of the aging car
button, then turn on the switches corresponding to each lamp in turn, and observe the lamps.
Whether it is normally lit, if it is not lit, power off to check the cause
After aging, it is necessary to test the electrical parameters of the whole lamp
4. Install the lens
1. Before installing the lens, wipe the surface of the light source with an eraser and then use a blower
The dust gun will clean up the garbage generated by wiping, and then use the dust-free cloth to stain it.
alcohol, and then wipe the surface of the light source to ensure that there is no foreign matter on the surface of the light source
Wait;
2. The lens pressure ring should be as flat as possible on the radiator
5. Appearance and waterproof inspection
After the lamp is installed, check the appearance, whether there is wear or not, and whether the installation is in place. and in accordance with the
The waterproof test is carried out according to the protection level.
Description: The following is the general process flow chart of our company's production of LED lamps, including all process nodes of LED lamp production. Due to the different degrees of complexity of different types of LED lamps and lanterns, in actual production, one or one of the products is deleted according to the actual situation of the product. some process nodes.
Production Notes:
1. Drilling of lamp housing and substrate
The base plate is fixed on the lamp housing, and screw holes must be drilled. However, the holes punched by the lamp housing manufacturer may not be enough, or they may not be drilled. This requires you to drill holes for screws. When drilling, pay attention to the fact that the outer wall of the lamp housing is not enough Thick, pay attention to the depth of the screw holes when drilling, and be careful not to penetrate the lamp housing.
2. Keep in mind the lamp parameters
From the entry of accessories to the appearance of lamps, it is necessary to pass the power-on inspection and analysis of the lamps for many times. It is necessary to pay attention to the parameters of the detected lamps. If the voltage and current are incorrect, it will directly lead to damage to the lamps.
3. Anti-static
When welding lamps and lanterns , be sure to take anti-static measures. Otherwise, static electricity will easily break down the lamp beads, causing the entire module to be scrapped.
4. Inspect the structure of the lamps to ensure that the parts of the lamps are not missing, wrongly installed and
not installed in place;
5. Use the black clip of the grounding resistance tester to clamp the bottom wire of the power input power cord (yellow
green wire), with the ground resistance tester's red clips to the fins or housing of the heatsink. Press the green start button, if the resistance value shows less than or equal to 500mΩ,
Then the product passes the grounding resistance test, and then press the red button to reset the output of the device
6. Use the black clip of the insulation resistance tester to clamp the ground wire of the power input power cord (yellow
Green wire), use the red clip of the insulation resistance tester to clamp the live wire and the neutral wire. according to
Press the TO TEST button, if the resistance value displays ≥ 2MΩ or the display value is 1, the product
Pass the grounding resistance test, and then release the button to reset the output of the device.
7. Light up the lamp electrical parameter tester or test fixture that has been tested above to ensure that
After the safety test , the electrical parameters of the lamps are normal.
Note: The above is the general process flow chart of our company's production of LED lamps, including all the process nodes of LED lamp production. Due to the different degrees of complexity of different types of LED lamps and lanterns , in actual production, one or more is deleted according to the actual situation of the product. Certain craft nodes.
Post time: Feb-23-2022


